Introduction
Artificial intelligence is rapidly transforming the way we build applications, and Google’s Gemini AI is at the forefront of this revolution. Gemini is a powerful multimodal AI model designed to handle text, images, and more, making it a great tool for developers looking to integrate AI-driven features into their apps.
In this article, we’ll explore how to use Gemini in Flutter, Google’s UI toolkit for building cross-platform applications. We’ll start with text-based interactions, leveraging Gemini’s natural language processing (NLP) capabilities to generate responses, summarize content, or assist users in real time.
By the end of this guide, you’ll have a solid understanding of how to integrate Gemini into your Flutter app and unlock the potential of AI-powered features.
Google Generative AI Package for Flutter
To make it easier for developers to integrate AI-powered features into Flutter applications, Google provides the Google Generative AI package. This package offers a streamlined way to interact with Gemini, allowing developers to leverage its capabilities for text generation, image creation, and other AI-driven functionalities with minimal setup.
Package link: https://pub.dev/packages/google_generative_ai
Key Features:
✅ Easy API Integration: No need to manually handle HTTP requests — just use the package’s built-in methods.✅ Support for Text and Image Generation: Seamlessly interact with Gemini for NLP tasks and AI-generated images.✅ Optimised for Flutter: Designed to work efficiently within Flutter apps, ensuring smooth performance.✅ Built-in FunctionCall support: Built-in support for API key management and authentication best practices.
By using this package, Flutter developers can quickly integrate AI features without worrying about complex API calls or response handling. In the next section, we’ll walk through the installation and setup process to get Gemini running in a Flutter app. 🚀
Google AI Studio
Google AI Studio is a web-based platform that allows developers to explore, experiment with, and integrate Gemini AI into their applications. It provides an intuitive interface to test AI models, generate API keys, and fine-tune responses before implementing them in a production environment.
Key Features:
✅ Easy API Key Management — Quickly generate and manage API keys for integrating Gemini into your app.✅ Interactive Playground — Test Gemini’s capabilities in real-time without writing any code.✅ Customizable Prompts — Fine-tune input prompts to optimize AI-generated responses.✅ Comprehensive Documentation — Access guides, tutorials, and best practices for using Gemini effectively.✅ Code Generation — Generate code for multiple languages, including Dart for Flutter.
Before we start coding, let’s first obtain an API key from Google AI Studio to authenticate our requests when using the Gemini AI API.
Implementation
Step 1: Get Your Gemini API Key
To integrate Gemini AI into your Flutter app, you first need an API key from Google AI Studio. Follow these steps to obtain one:
1️⃣ Go to Google AI Studio
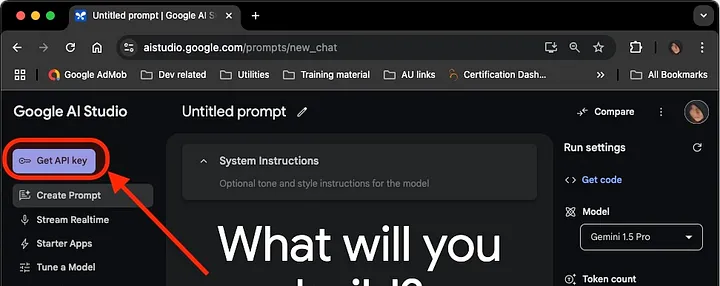
2️⃣ Click the Get API Key button in the top left corner.
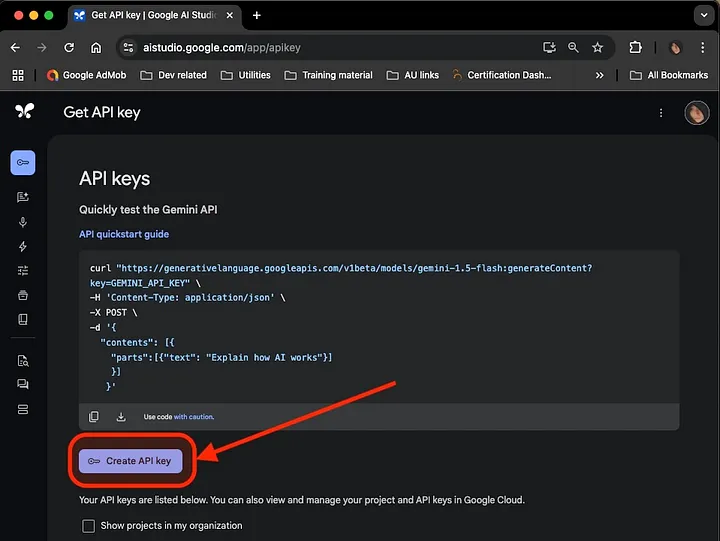
3️⃣ Click Create API Key to generate a new key, or select an existing key from the list.
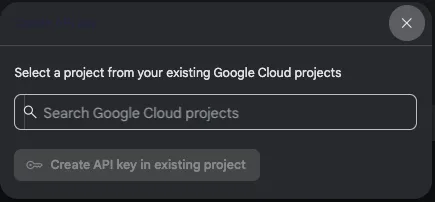
4️⃣ Create API key in new Google Cloud project, or select an existing project to create API Key in
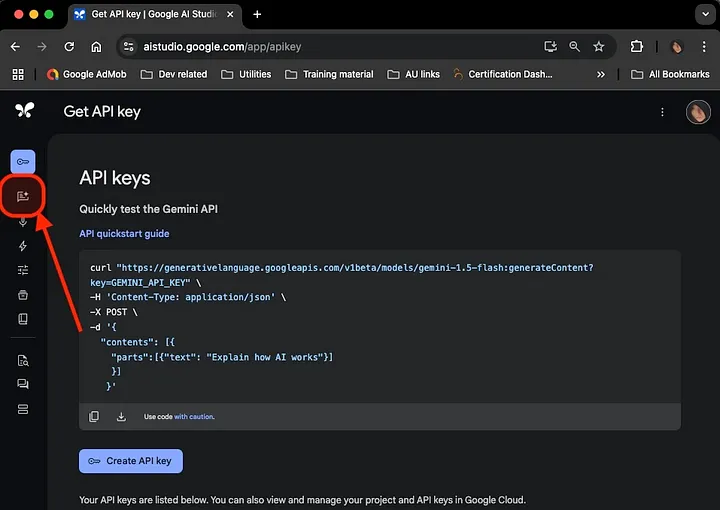
5️⃣ Make sure to save this API key securely, as we’ll need it later in the integration.
Step 2: Select Gemini Model and Create a Sample Prompt in AI Studio
Before you start integrating the Google Generative AI package, let’s first configure Gemini AI in AI Studio to choose the model you want to use and create a sample prompt.
1️⃣ In AI Studio, click on Create Prompt button
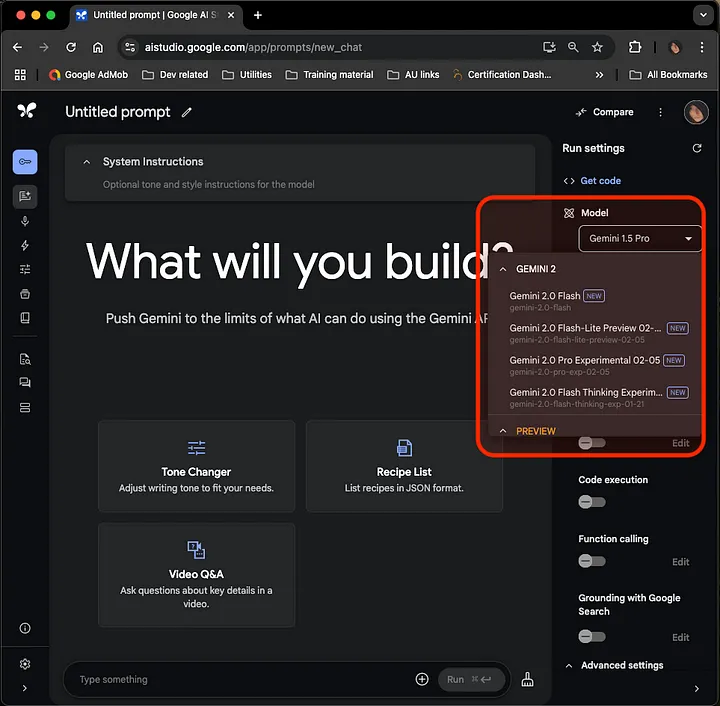
2️⃣ Select the Gemini model you want to use for your project. The model options is on the right panel of the screen, and it might include various versions of Gemini (e.g., gemini-pro, gemini-lite). Choose the one that suits your use case the best. In PC, you can hover your mouse cursor over the model names to view details of each model, including pricing, best application, and example use-cases.
3️⃣ Create a sample prompt:
In the AI Studio Playground, you can enter a sample prompt to test how the model responds.
This helps you fine-tune the input and understand the expected results before integrating the model into your Flutter project.
Example prompt:
“What are the latest trends in mobile app development in 2025?”
4️⃣ Test the model and adjust the prompt if necessary until you get the desired results. This will help ensure that your app’s interactions with Gemini are smooth and efficient.
Once you’ve selected the model and tested your prompt, it’s time to move forward and integrate the Gemini API package into your Flutter project.
Step 3: Integrate Google Generative AI Package to Flutter project
Now that we have our Gemini API key, let’s integrate the Google Generative AI package into our Flutter project.
1️⃣ Open your Flutter project in a terminal or your preferred IDE.
2️⃣ Run the following command to install the package:
flutter pub add google_generative_aiThis will add the Google Generative AI package to your pubspec.yaml file and fetch the latest version. The command flutter pub get is no longer needed here.
3️⃣ Run the project to ensure the dependencies are installed correctly:
flutter run apkWith the package integrated, we’re now ready to authenticate and make requests to the Gemini AI API. Let’s move on to the next step! 🚀
Step 4: Implement Gemini AI in Your Flutter App
1️⃣ Set Up the API Key Using --dart-define
To securely store your API key, use --dart-define to pass the key at build time, ensuring it’s not exposed in the source code. This is also useful when you have multiple environment for Development, Staging, or Production in CICD pipeline.
Add the API key as a build-time constant.In your flutter run or flutter build command, pass the API key using --dart-define:
flutter run — dart-define=GEMINI_API_KEY=YOUR_GEMINI_API_KEYReplace YOUR_GEMINI_API_KEY with API key from Step 1 above
2️⃣ Initialise Gemini API with --dart-define
Update your GeminiService to use the API key from
import 'package:google_generative_ai/google_generative_ai.dart';

class GeminiService {
  static String get geminiApiKey => const String.fromEnvironment('GEMINI_API_KEY');

  // define a Gemini model
  final GenerativeModel _model = GenerativeModel(
    model: 'gemini-1.5-pro',
    apiKey: geminiApiKey,
  );

  // create a function to generate single text content
  Future<String> generateText(String prompt) async {
    try {
      final response = await _model.generateContent([Content.text(prompt)]);
      return response.text ?? "No response from AI"
    } catch (e) {
      return 'Error: $e';
    }
  }
}
This source code is also available from AI Studio, when you click on Get Code button. However the source code from AI Studio might not be suitable to used directly in a project code, therefore I re-write it here by creating a GeminiService class. The model can be updated by changing the Gemini model from AI Studio, and copy the model name from Get Code session in AI Studio.
In this sample code, I use generateContent function, which will generate single response for 1 single prompt. This function will not keep chat history and Gemini will not remember the context of the chat. To keep chat history, we can use startChat function to create a new session
import 'package:google_generative_ai/google_generative_ai.dart';

class GeminiService {
  static String get geminiApiKey => const String.fromEnvironment('GEMINI_API_KEY');

  final GenerativeModel _model = GenerativeModel(
    model: 'gemini-1.5-pro',
    apiKey: geminiApiKey,
  );

  late final ChatSession _chatSession;

  GeminiService() {
    // Start a new chat session when the service is initialized.
    _chatSession = _model.startChat();
  }

  Future<String> sendMessage(String prompt) async {
    try {
      // Send the message and get the response.
      final response = await _chatSession.sendMessage(Content.text(prompt));
      return response.text ?? "No response from AI.";
    } catch (e) {
      return "Error: $e";
    }
  }
}
With this source code, Gemini will remember the chat content of the current session. To load chat history from previous session, send the list of chat history to history when create new _chatSession with startChat function
GeminiService() {
    // Start a new chat session when the service is initialized.
    _chatSession = _model.startChat(
      history: [] // add a list of chat history from your database here
    );
  }
3️⃣ Update UI to Handle Chat History
We’ll adjust the Flutter UI to display the ongoing conversation. The sendMessage method will be used to interact with the AI, and we'll maintain the chat history.
import 'package:flutter/material.dart';
import 'services/gemini_service.dart';

void main() {
  runApp(const MyApp());
}

class MyApp extends StatelessWidget {
  const MyApp({super.key});

  @override
  Widget build(BuildContext context) {
    return const MaterialApp(
      home: GeminiChatScreen(),
    );
  }
}

class GeminiChatScreen extends StatefulWidget {
  const GeminiChatScreen({super.key});

  @override
  _GeminiChatScreenState createState() => _GeminiChatScreenState();
}

class _GeminiChatScreenState extends State<GeminiChatScreen> {
  final TextEditingController _controller = TextEditingController();
  final GeminiService _geminiService = GeminiService();
  List<String> _messages = [];

  void _sendPrompt() async {
    final prompt = _controller.text;
    if (prompt.isNotEmpty) {
      setState(() {
        _messages.add("You: $prompt");
        _messages.add("AI: Thinking...");
      });

      final result = await _geminiService.sendMessage(prompt);

      setState(() {
        _messages[_messages.length - 1] = "AI: $result"; // Update AI response
      });
    }
  }

  @override
  Widget build(BuildContext context) {
    return Scaffold(
      appBar: AppBar(title: const Text("Gemini AI Chat")),
      body: Padding(
        padding: const EdgeInsets.all(16.0),
        child: Column(
          children: [
            Expanded(
              child: ListView.builder(
                itemCount: _messages.length,
                itemBuilder: (context, index) {
                  return ListTile(
                    title: Text(_messages[index]),
                  );
                },
              ),
            ),
            TextField(
              controller: _controller,
              decoration: const InputDecoration(
                labelText: "Enter your prompt",
                border: OutlineInputBorder(),
              ),
            ),
            const SizedBox(height: 10),
            ElevatedButton(
              onPressed: _sendPrompt,
              child: const Text("Send"),
            ),
          ],
        ),
      ),
    );
  }
}
Conclusion
In this tutorial, we’ve successfully integrated Gemini AI into a Flutter app, allowing us to interact with the AI in a chat-like format while maintaining chat history. We used the Google Generative AI package, configured the Gemini model in AI Studio, and handled communication with the model through a simple Flutter UI.
With this foundation, you can now expand your app further by adding more complex interactions and features. In the next steps, we’ll explore how to work with image generation and uploading media files to enhance the capabilities of your app even further.
Stay tuned for the upcoming posts, where we’ll dive deeper into these exciting features!
コメント